Why need Alexa Verification Code?
Most important Alexa verification code adding for every blog site. Here I will discuss How to Add Alexa Verification Code in blog. When we are visiting any blog from the Google searching then firstly we are looking Alexa rank. Is it higher or lower? Higher Alexa rank means it receive huge visitors or it is the valuable site in every place. On the other hand any advertisers who are buys ad place they firstly touch what’s Alexa ranking positions. Just example if you can achieve under 100k ranking that means very good position. Besides maximum blogger known best Alexa ranking sites are very popular over all in the world. So they visit again and again that site. Now how to improve this ranking? Alexa code verification is the first way to improve your ranking. When you have to verification this step then put this code under head option in your blog site. Here I will share a tutorial about verification code in Alexa. If you use this techniques you can easily make a code for your site. So let’s start the tutorial.
Claim Your Blog On Alexa
Below the some steps which use for submitting your site in Alexa.
1. Open the Alexa.com site and create an account.
2. Now log in you Alexa account. If you don’t want to new account in Alexa then you can use your Facebook account.
3. Now you go to alexa site owner page.
4. Now put your sites URL in blank place and then click on Claim Your Site button as shown in the below screenshot.
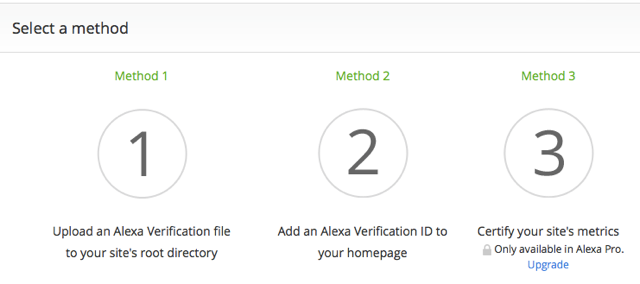
5. On the next page you will see picture or screenshot. Then you click method 2 option where write add an Alexa verification ID to your home page.
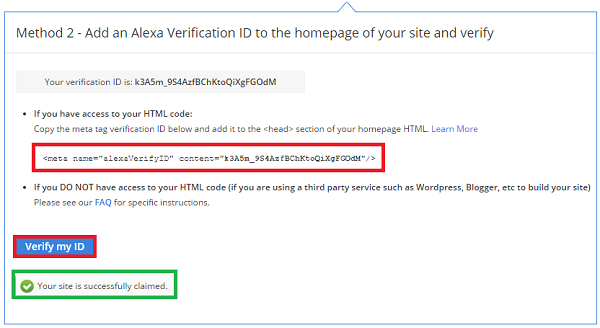
6. When you click above option 2 then you will get your site’s verification ID. Example: just look like below screenshot.
7. If you are using blogger host then you must choose option 2 and add a meta tag in your blog template under head section.
8. Adding after meta tag in head section in your blog, go back to Alexa and click on “Verify my ID” button.
9. If everything is right you must receive a confirmation message like below picture.
10. Click on continue to add your site details.
11. Now you are done successfully.
Conclusion
Successfully we have learned How to Add Alexa Verification Code in blog site. If you want to improve this ranking you should verify this code at this moment. I hope after adding this code improve your Alexa rank must.


